General FAQ
Which browsers does Dropsolid support?
Which browsers does Dropsolid support?
We support the latest + the major version before that, of the following browsers:
- Windows
- Chrome
- Firefox
- Edge (IE versions are not supported by default)
- MacOS
- Safari
- Chrome
- Firefox
- Linux
- Chrome
- Firefox
For example, if Safari was on version 16.7.8, we would support version 15.0.1 up to 16.7.8
We also don’t support browsers that don’t have support from the product team (eg. Microsoft Explorer)
Mobile
When you have a mobile design, we take this into account as well as possible and ensure that they are responsive. Pixel-perfect conversion of design to the web is a myth, but we guarantee that it will work functionally.
Why these browsers and versions?
Let’s take a look at what browsers there are and what their market share was in May 2025:
- Chrome: 60.24% - Webkit (Chromium)
- Safari: 20.24% - Webkit
- Firefox: 4.15% - Gecko/Quantum/Webkit (on mobile)
- Edge: 6.14% - Webkit - Webkit (Chromium)
- Samsung Internet: 3.23% - Webkit (Firefox)
- Opera: 2.75% - Webkit (version 15+)
This data is coming from the following source: filtered on Europe.
To support the largest possible audience and to be able to keep the technical & costs in control for you as a customer, we support the browsers (and versions) listed above.
If we take a look at this data, we see that Internet Explorer is no longer being tracked. The browser was running behind on other browsers (0.18% market share in 2023) and no longer supported by Microsoft. With this in mind, we can no longer offer support for it.
Want to adjust something in a browser that isn't supported by default?
If you still want to see some things changed in browsers that are not in this list, we can take a look at this for the latest version of the given browser:
- Send an email with your desired adjustments to our Support Desk.
- One of our developers will make an estimation of the work needed.
- When you approve, we will carry it out and invoice you for it. The estimation is, however, just a guide.
If you have any other questions about this, please do not hesitate to contact us via mail our Support Desk or by telephone at +32 (0) 9 395 02 90.
How do I empty my browser cache or clear my cookies?
How do I empty my browser cache or clear my cookies?
What is the difference between browser cache and cookies?
When you browse the Internet and visit sites, your browser stores frequently accessed or recently used styles, images, icons, scripts, and other on-page resources in a temporary storage area, to improve the loading speed of applications and websites. This space is called a cache.
Cookies, however, store user-specific information and preferences. Usually, you have to accept or refuse cookies the first time you enter a website that uses this.
There are other ways data of a surfing session can be temporarily stored (eg. localStorage) but the principles and clearing of it is largely the same.
All of these can be cleared if you are experiencing issues surfing a website.
What is a hard refresh?
A hard refresh clears your browser cache, for the page you are currently on. If the page you are on doesn't look quite right, often times a hard refresh can rectify the situation.
This does NOT remove cookies or session data.
How to do a hard refresh.
Google Chrome
- Windows: hold down Ctrl or Shift and then press F5 on your keyboard
- Mac: hold down Cmd and Shift and then press R on your keyboard
Firefox
- Windows: hold down Ctrl or Shift and then press F5 on your keyboard
- Mac: hold down Cmd and Shift and then press R on your keyboard
Safari
- Mac: hold down Opt and Cmd and then press E on your keyboard
Microsoft Edge
- Windows: hold down Ctrl or Shift and then press F5 on your keyboard
How to clear your cookies (or browser data)
In some cases, clearing the cache alone is not enough. You may need to start your surfing experience fresh by clearing your data and cookies. Be aware that after doing this, passwords and usernames saved in the browser, will also be forgotten and no longer prefilled.
Google Chrome
- Click on the upper right in the menu on the 3 vertical stripes, the hamburger menu.
- Click on 'Settings'.
- Find click on 'Privacy and security'.
- Click on 'Clear browsing data'.
- Choose a 'Time range' and the components you want to delete.
We suggest checking checking 'Cookies and other site data' and 'cached images and files' - Click on 'Clear data'.
Firefox
- Open the menu beneath Tools (Extra) and choose 'Options'
- Or look open the menu beneath Firefox and choose 'Settings'
- Click on 'Privacy & Security'
- Scroll to 'Cookies and Site Data'
- Click on 'Delete now'
Safari
- Open the menu beneath 'Safari' and choose 'Settings'
- Find and click the 'Privacy' item
- Look for 'Cookies and website data' and click the 'Manage Website Data' button
- Select all the sites you wish to delete the data & click 'Remove'
- Or click 'Remove all' to remove the data of ALL the sites you have visited in the past
- Confirm your action
Microsoft Edge
- Click on the upper right in the menu on the 3 vertical stripes, the hamburger menu.
- Click on 'Settings'
- Go to 'Delete browser data'
- Click on 'Choose what you want to delete'
- Check 'Data and files in the cache'
- Click on 'Delete'
What is Recaptcha?
What is Recaptcha?
ReCAPTCHA is a CAPTCHA system that allows web hosts to distinguish between human and automatic access to websites.
If you experience a lot of spam in your mailbox or you want to secure your contact forms better, we recommend the reCAPTCHA module.
How do I use reCAPTCHA?
How do I use reCAPTCHA?
In order for the reCAPTCHA spam protection to function correctly on your website, you need to request the correct keys. This is how you do it:
- Log in with your Google-account
(Already have a Google Analytics account? You can use the same login details)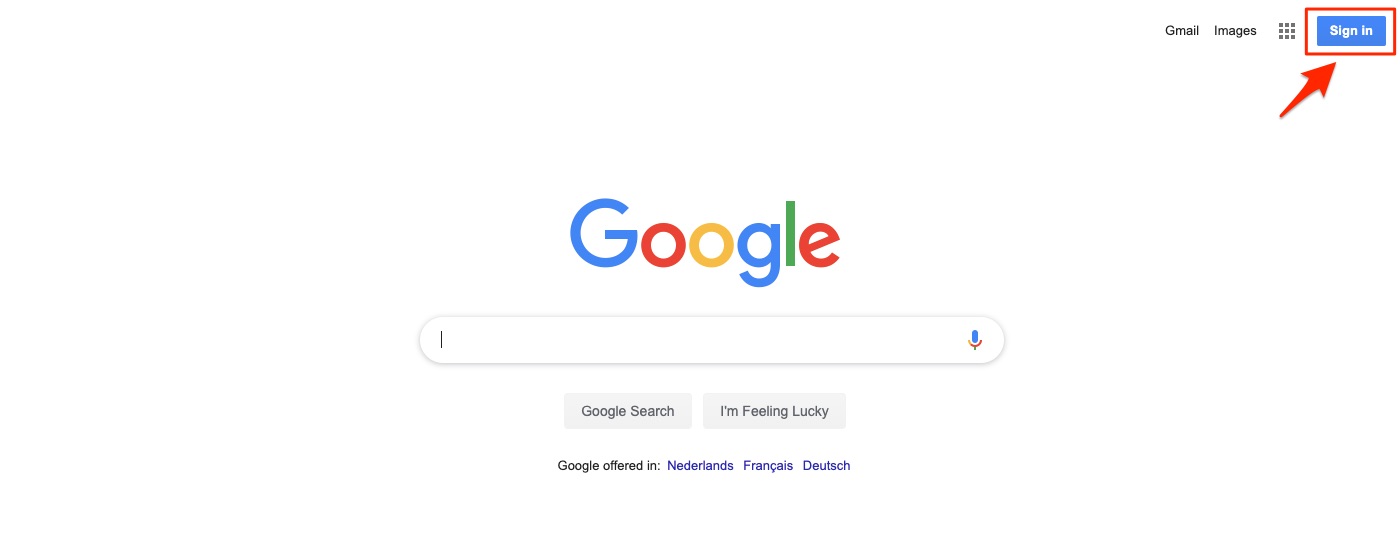
- Surf to https://www.google.com/recaptcha/admin/create
- Add your website via ‘Register a new site’
- Label: website.be
Enter the name of your website - Type of reCAPTCHA: reCAPTCHA V2
- Domains: enter all domain names where your website appears (without HTTP://)
Also add the .dev and the .staging domain names. Not entirely sure? Request them via support@dropsolid.com
- Label: website.be
- Accept the ‘Terms and conditions’
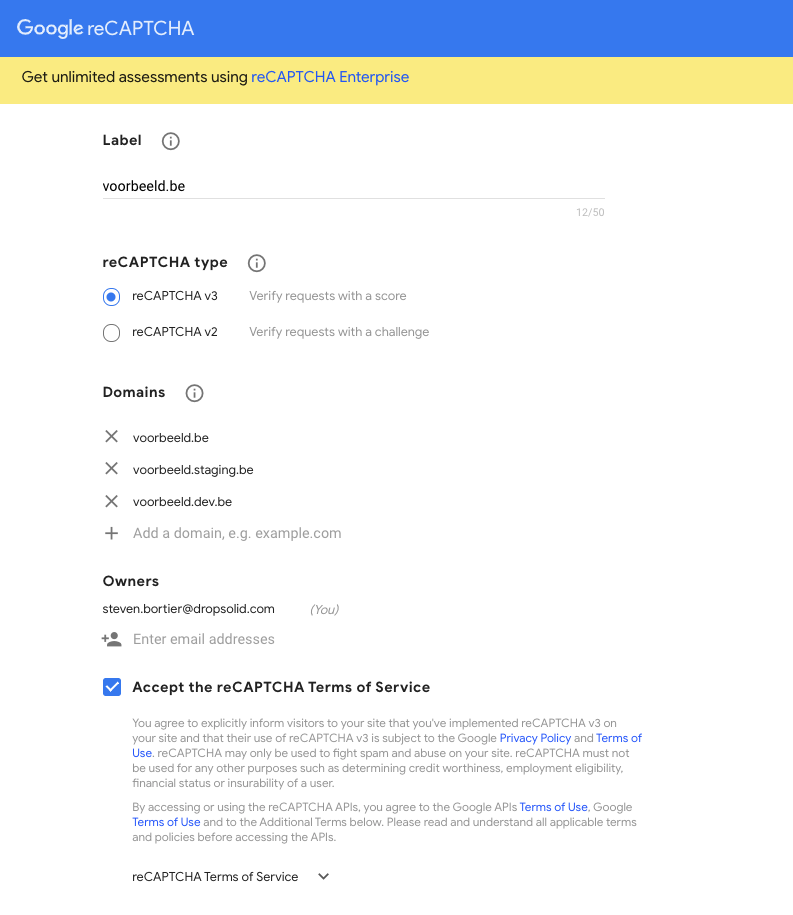
- Click on ‘Register’
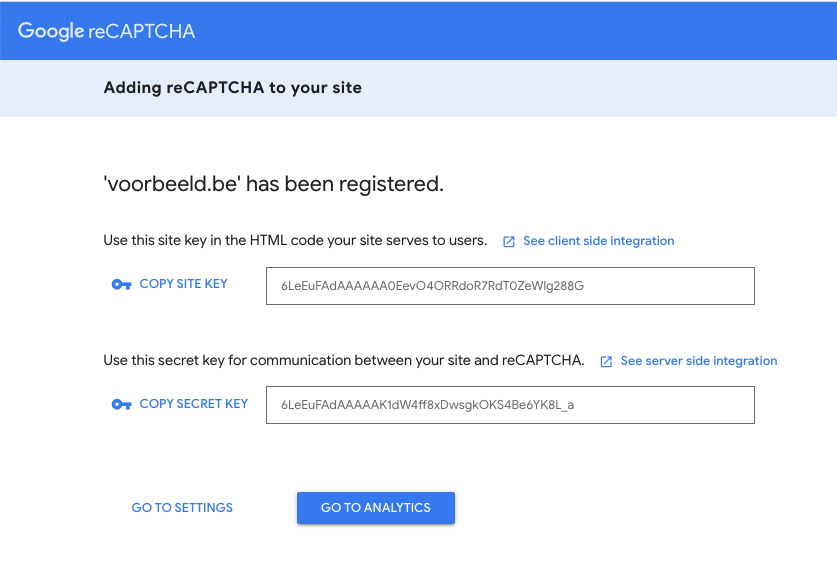
You will now see the site key and secret key. Please provide both in plain text (not a screenshot) to your Dropsolid contact person or via support@dropsolid.com.
What is Google Tag Manager?
What is Google Tag Manager?
Google Tag Manager is a tool that allows you to easily add and remove tags from your website yourself, without the intervention of a developer. Each tag is a piece of code from another program that measures events on your website. Examples are tags from Google Ads, Google Analytics and Floodlight.
How do I install Google Tag Manager?
How do I install Google Tag Manager?
- Surf to tagmanager.google.com and make an account.
You can also log in to an existing account. - A new container will be created by default, and you can easily create additional containers.
- Install the container on your website
Add the container frame following Tag Manager's instructions and remove existing tags. - Add your tags and publish them.
Note
Note: a Tag Manager account is the highest organizational level. Usually only one account per company is needed. This account contains one or more containers. There are specific container types used for websites, AMP pages, Android apps and iOS apps.
How do I make a new Google Tag Manager account and add a container?
How do I make a new account and add a container?
- Click on 'Accounts' → 'Create account' in Tag Manager
- Enter an account name
- Enter a descriptive container name
- Select the content type: web, AMP, Android or iOS.
- Click on 'Create'
- Read the terms and conditions and click 'Yes', if you agree to those terms.
- When your new container loads for the first time, it will ask for the code snippet for installing the web container. Install the code snippet immediately or click 'OK' to close the dialog box. You can always first set up your container and install the container snippet later.
How to add a new Google Tag Manager container to an existing account?
How to add a new container to an existing account?
- Click 'Accounts' next to the appropriate account name in Tag Manager
- Choose 'Create container'
- Enter a descriptive container name
- Select the content type: web, AMP, Android or iOS
- Click on 'Create'
- Read the terms and conditions and click 'Yes', if you agree to those terms.
- Important: please also add analytics@dropsolid.com as admin of the container, so we can help you easily and quickly.
How do I find my Google Analytics ID?
How do I find my Google Analytics ID?
- Log in to your Google Analytics account and go to the homepage. You do this by clicking on the Google Analytics logo on the upper left.
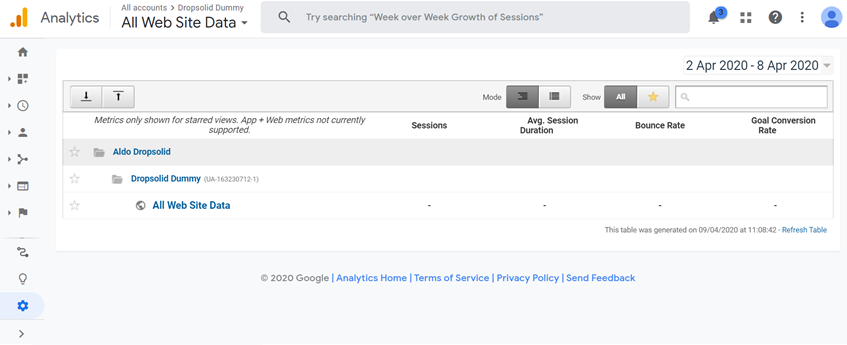
- Click on the bottom left on 'Admin'
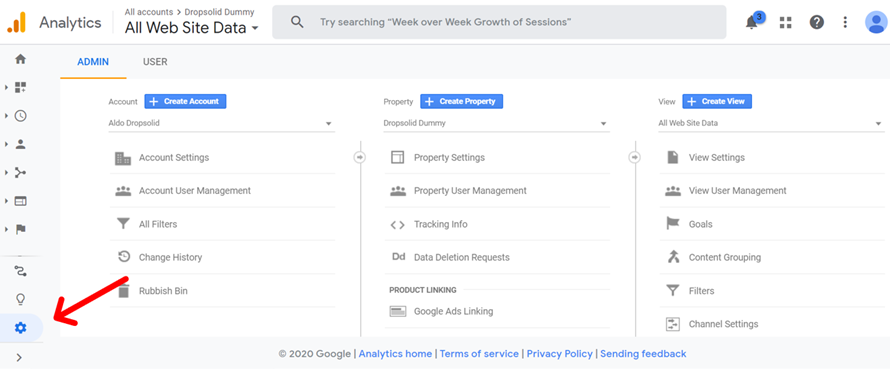
- Click underneath the Property column on 'Tracking Info'.
- Click on 'User-ID'
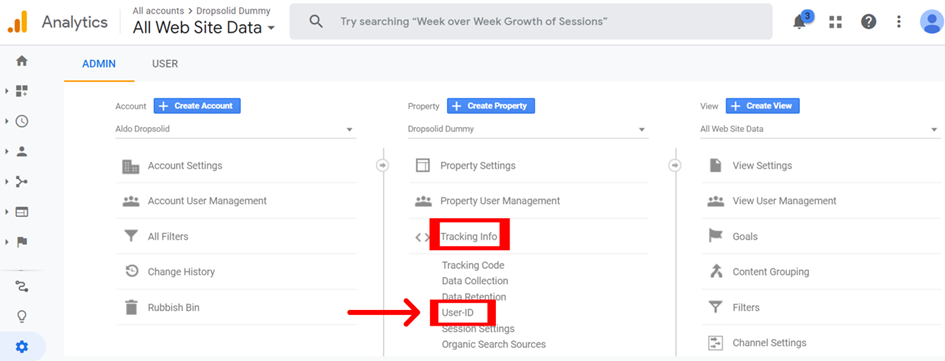
- On the top, you can find your Google Analytics ID.
How to add a new user to Google Analytics?
How to add a new user to Google Analytics?
- Make sure you're logged in to Google Analytics.
- Click on the bottom left in the menu on 'Admin'.
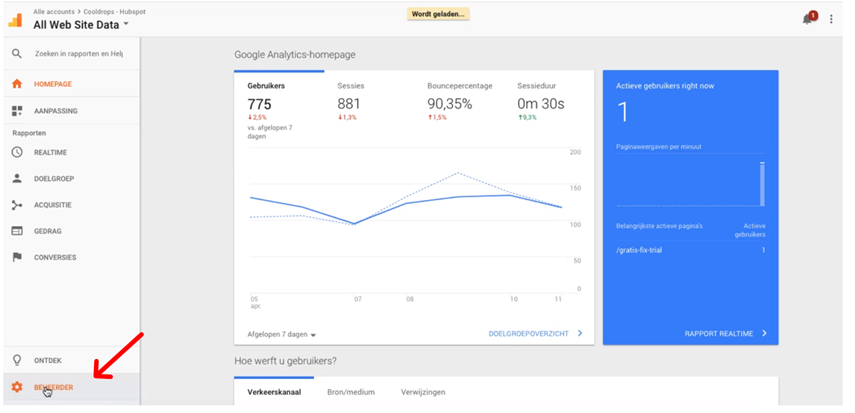
- Click on 'Account Access Management'.
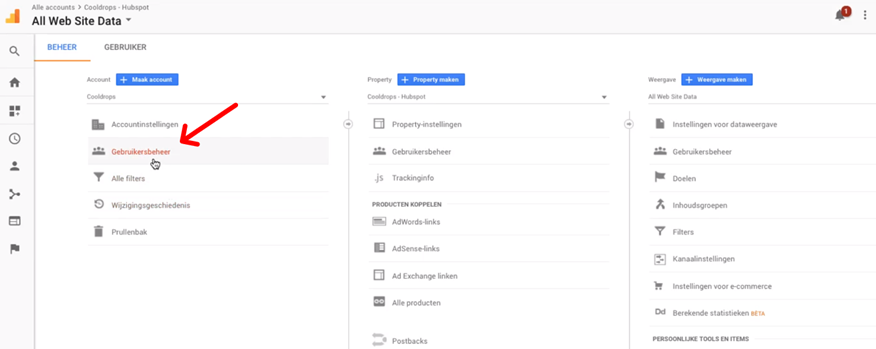
- A window pops up with a plus (+) on the top right.
- Click on the plus and click on 'Add new user'.
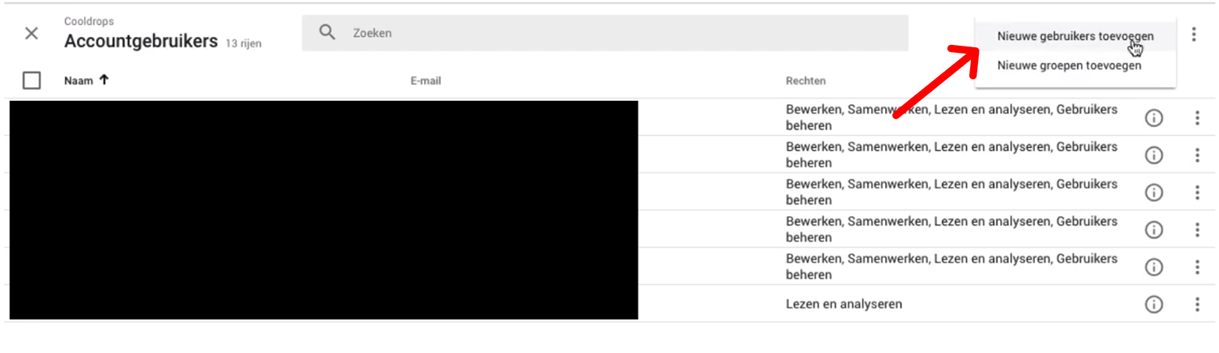
- Fill in the email of the user you want to add.
- Check the correct rights.
- Click on the top right on 'Add' to validate a new user.
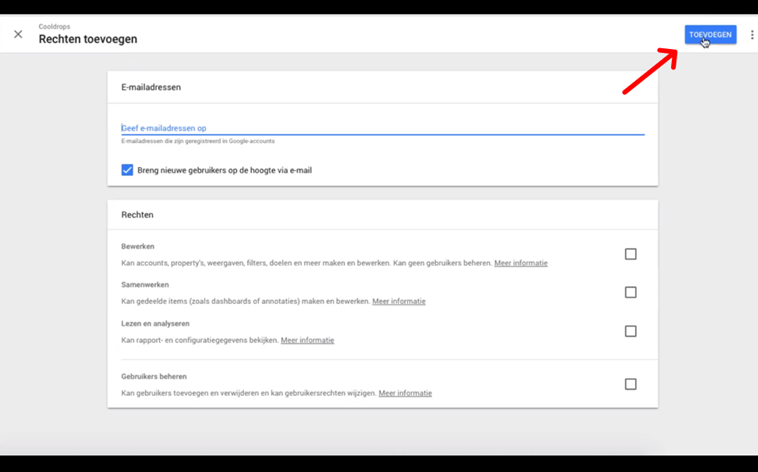
- Click on the plus and click on 'Add new user'.
How do I put my business visually on my website?
How do I put my business visually on my website?
Google Maps is the perfect way to visually display your business location on your website. The location of your business will have a pin on the map. This pin should be in exactly the right place. To do this, you need to request the right keys via your Google account.
How do I add Google Maps to my website?
How do I add Google Maps to my website?
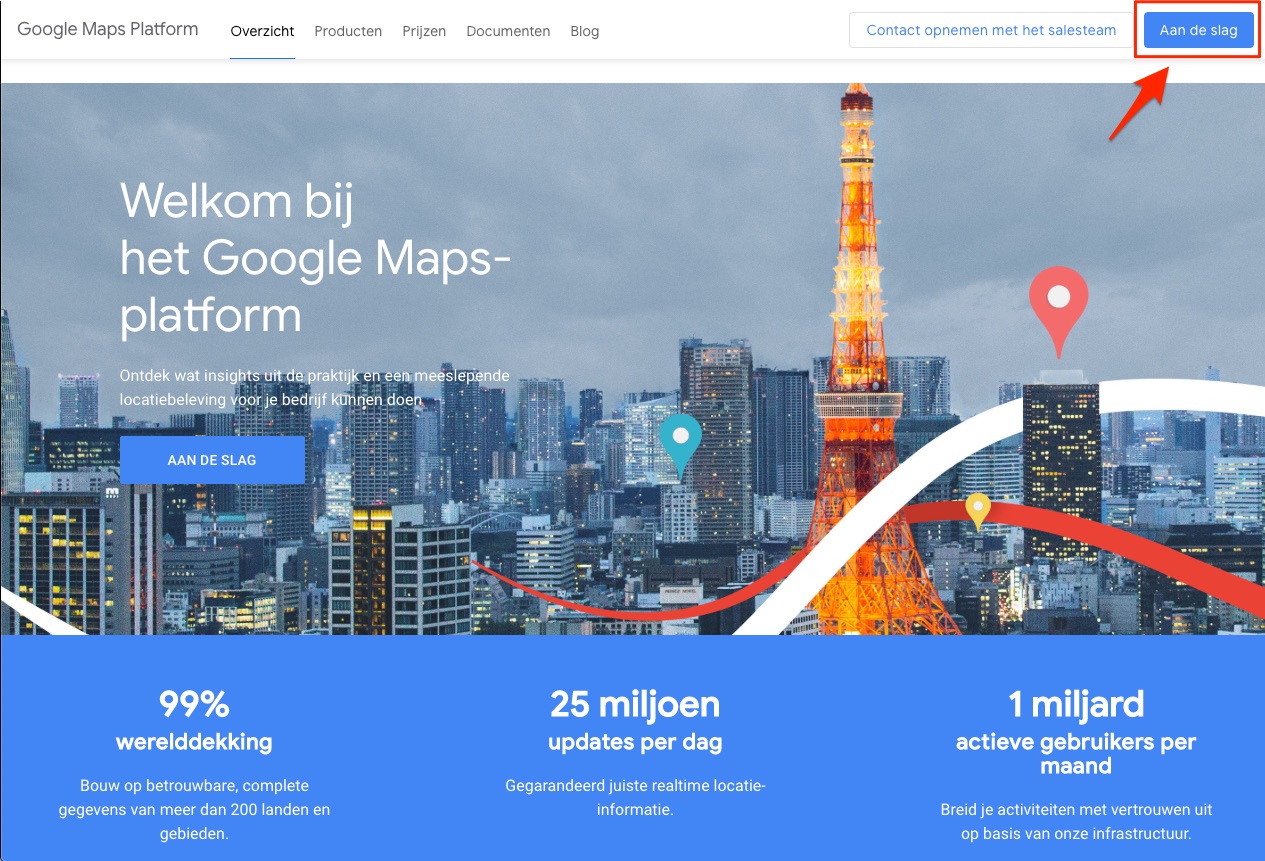
- Surf to https://cloud.google.com/maps-platform .
- Click on 'Get started'.
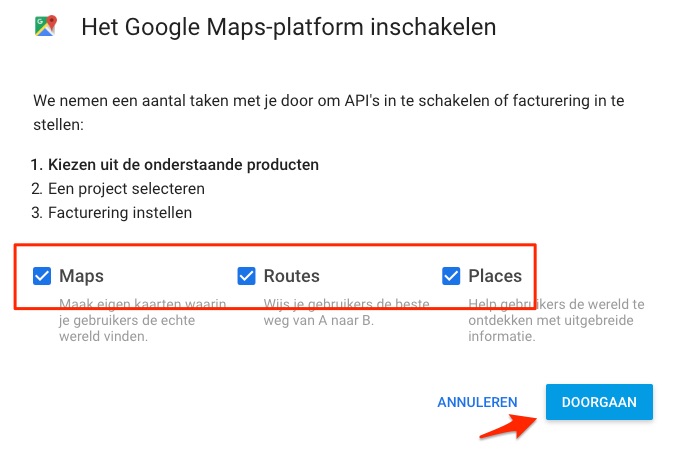
- A pop-up window will appear, check all three checkboxes and click 'Continue'.
- Sign in to your Google account.
- Not signed in yet? Then do so in the next step.
- Are you already logged in? Then this step will be skipped automatically.
- Enter your project name and click 'Next'.
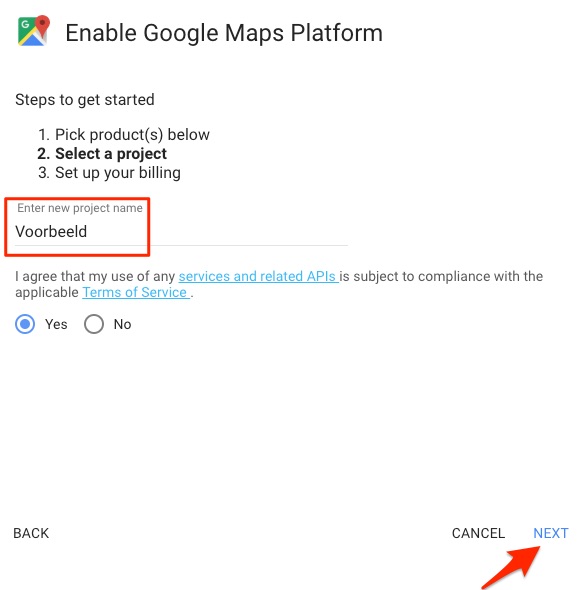
- Enter your billing information to use your free account.
- For your information: Each account gets $200 usage per month for free (at time of writing). This is normally sufficient for a basic website.
- More info can be found at https://cloud.google.com/maps-platform/pricing.
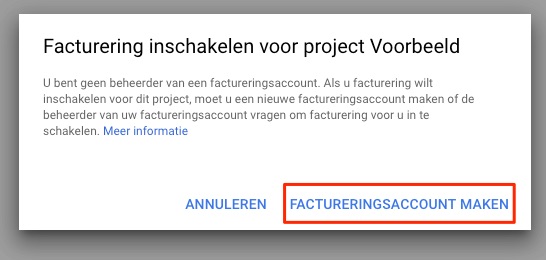
- You will now see the API key appear. Copy this key and pass it on to your Dropsolid contact or via support@dropsolid.com.
- Note: deliver this key in plain text, not in a screenshot.
- Surf to the Google Platform via https://console.cloud.google.com/apis/library and enable the following:
- Maps Javascript API
- Geocoding API
All done! If you still have questions, feel free to ask them via support@dropsolid.com.
How do I add a map with multiple addresses?
How do I add a map with multiple addresses?
- Make sure you're logged into Google.
- Go to Google Maps.
- Click on the top right on the hamburger menu (the three horizontal lines) to open the menu in Google Maps.
- Click on "My places" in the menu.
- Click on 'Maps'.
- Click at the bottom on 'Make map'. A new tab opens automatically. This is where you put your map together.
- Type in the search bar the address of the location you want to add to the map.
- When the address has a green pin, you click 'add to map'. The location is now added to your map.
- To add the next location, type again an address in the search bar. Click on 'Add to map'.
- This way, you can add as many locations as you want to your map.
- You change the name of your map by clicking on the three dots 'Nameless layer'. Next, you select 'Change name of layer'.
- When you've added all of your locations, share them by clicking on 'Share' in the menu. You name the map and give a description if desired.
- In the 'Sharing'-window, change the access so everyone can see the map.
- Go to 'Who has access', click on 'Change...' and select 'On, public on the internet'.
- Last, you have to copy the code to add the map to your website.
- Click in the menu on the three dots. Next, click on 'Include on my site'.
- Copy the code that appears, and add it to your website.